Local environment hosts the production client and API builds plus PostgreSQL in Zerops while the developer runs Wasp locally against the cloud database via VPN.
Taking ownership of the Local environment
Clone the template repositories
Fork or clone the following to your local machine or GitHub account:
1. Create an access token and install zCLI
Before you start, create an access token and install zCLI so your local machine can work with your Zerops account.
- Open Access Token Management in the Zerops Dashboard: https://app.zerops.io/settings/token-management
- Create a new personal access token and copy it immediately.
- Install zCLI:
npm i -g @zerops/zcli- Log in with your token:
zcli login <personal-access-token>If you do not use npm, check the zCLI documentation: https://docs.zerops.io/references/cli

Tip
Save the token in a password manager right away. You will not be able to see it again after leaving the page. You can always create multiple tokens and revoke them independently.
2. Start the VPN
To reach private databases or services from your local machine, open a secure tunnel into the project network.
- Run:
zcli vpn up- Select your project from the list.
- Keep the VPN connection active while working locally.
- Use internal hostnames such as
db,redis, orapi.
Tip
If a short hostname like db does not resolve, try db.zerops. For internal HTTP services reached through the VPN, use HTTP rather than HTTPS.
3. Find your service name
Many commands need the exact name of your service. You can find it in the Zerops Dashboard.
- Open your project in the Zerops Dashboard.
- In the project overview, find the service you want to manage.
- Use this exact name whenever a command asks for
<service-name>.
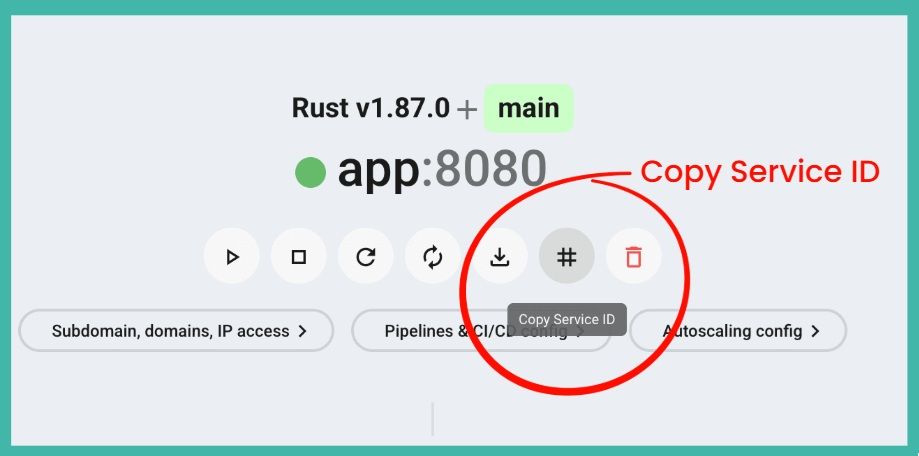
4. Download environment variables
Instead of copying values manually, export your service configuration into a local .env file.
- Export only user-defined variables:
zcli project env --service <service-name> --user-only > .env- Remove
--user-onlyif you also need system-generated variables. - Add
--exportif you want the output to include theexportkeyword for shell sourcing.
Tip
You can customize the output with the --template flag. The default format is {{.Key}}={{.Value}}.
5. Configure deployment pipeline
Decide how your code should reach the staging environment.
- In the Zerops Dashboard, go to Service Settings > Pipelines & CI/CD Settings.
- Connect your repository.
- Add a trigger so every push to your main branch starts a deployment automatically.
- If you prefer manual control, you can use
zcli pushlater instead of Git triggers.
6. Develop and test locally
With the VPN active and your .env file ready, run your application locally while it connects to Zerops-hosted services.
Example PostgreSQL connection:
psql -h db -U user -d databaseExample internal API check:
curl http://api:3000/health7. Push your code changes
When local tests pass, deploy your changes to the staging environment.
If you configured Git triggers:
git add .
git commit -m "feat: implement new feature"
git push
If you prefer pushing directly from your machine:
zcli push <service-name>8. Test your staging application
Verify the deployment before moving toward production.
- Open your application through the provided Zerops subdomain.
- Check runtime logs in the Zerops Dashboard under Service Settings > Runtime Logs.
- Confirm the app starts correctly and there are no deployment or runtime errors.
Deploy more environments
Related platform & services docs
Related Recipes
More recipes with similar technologies and categories.

TanStack Start Hello World
A server-rendered TanStack Start application with Nitro Node output, deployed on Zerops. Includes ready-made environment configurations for the full development lifecycle.

React (Vite) Static Hello World
A complete React + Vite hello world recipe for Zerops, demonstrating static site deployment with build-time environment variable injection — compiled by Node.js, served by Nginx, ready-made for every stage of the development lifecycle.

React Router Static Hello World
A complete React Router v7 hello world recipe for Zerops — deploying a React Router v7 SPA (static mode, no SSR) as a static site built by Node.js and served by Nginx, with ready-made environment configurations demonstrating build-time environment variable injection via Vite.
React Router SSR Hello World
A minimal server-side rendered application built with React Router v7 on Zerops, connecting to a PostgreSQL database. Includes ready-made environment configurations for every stage of the development lifecycle - from AI agent workspaces through local development to highly-available production.